

ARE YOU DENSE?
Density Matching: How it can make a Difference in How Long Your Repair Lasts and How Perfect Your Repair Looks…
By Doug Snow and Kian Amirkhizi
So, you’re out in the field making your fortune at used-car lots, repairing the cuts and holes on the various substrates of automobiles. Don’t know what a substrate is? Here is a definition from the Business Dictionary: “Primary or underlying material on which other materials (such as ink, coating, paint, or treatment) are applied, or from which other materials are made.” In our industry, it refers to the material you are working on, such as leather, vinyl, plastic, fabric, etc. But that’s sort of another subject, so moving on.
You just completed a beautiful repair that you are sure is going to clinch the sale of this car and really impress the manager. But have you ever gone back a few weeks later to find that the beautiful repair you did looks terrible? Or it didn’t last? Maybe the color is rubbing off exactly where you did your repair? Or, on a fabric cigarette-burn repair, the top of the repair is wearing off? And there is a hard spot like somebody put a marble under the seat? It just may be that your repair is acting like a marble. Huh? Well, this is where density matching comes into play.
Density Matching
What, exactly, do we mean by density matching? In our industry, think of it as trying to match to the material you are working on, especially the flexibility, thickness, etc. Whatever material you are working on, you will want to match the thickness and flexibility, and other characteristics. As an example—on a vinyl repair—if the repair compound that you use is more flexible than the vinyl itself (the substrate), you will find that your repair eventually will stretch out of shape and create a concave “dip.”
If the repair compound is too hard, your repair will become a hard spot and will wear out faster. That’s what I mean by your repair is a marble. If it gets super hard, it’s obvious why I say that, but, also, your repair won’t last very long when things (like people’s bottoms) are rubbing on that hard spot.
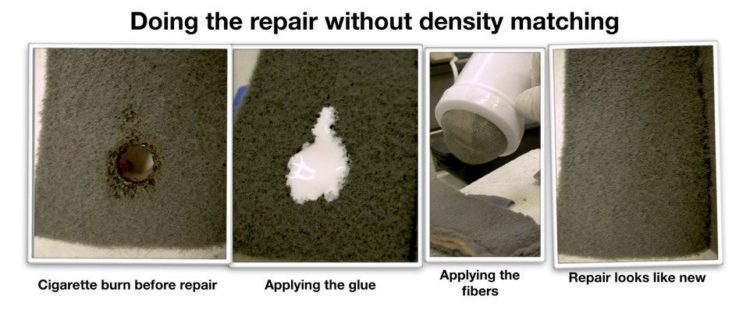
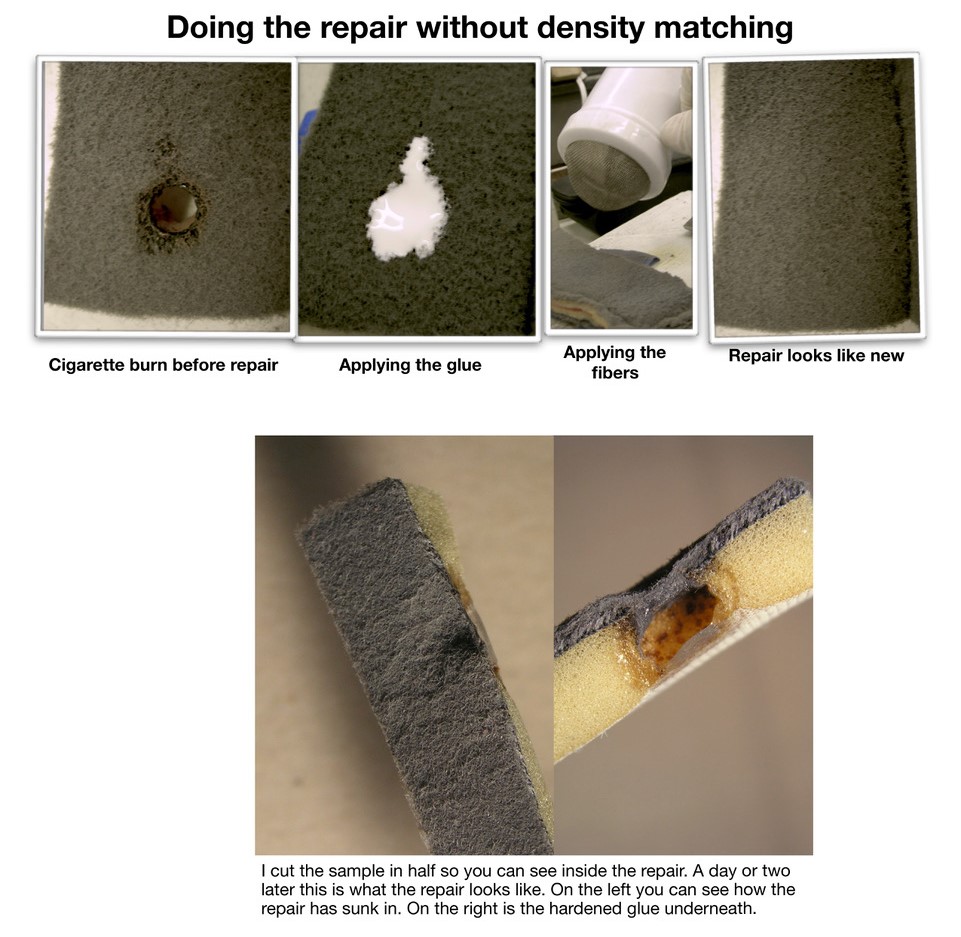
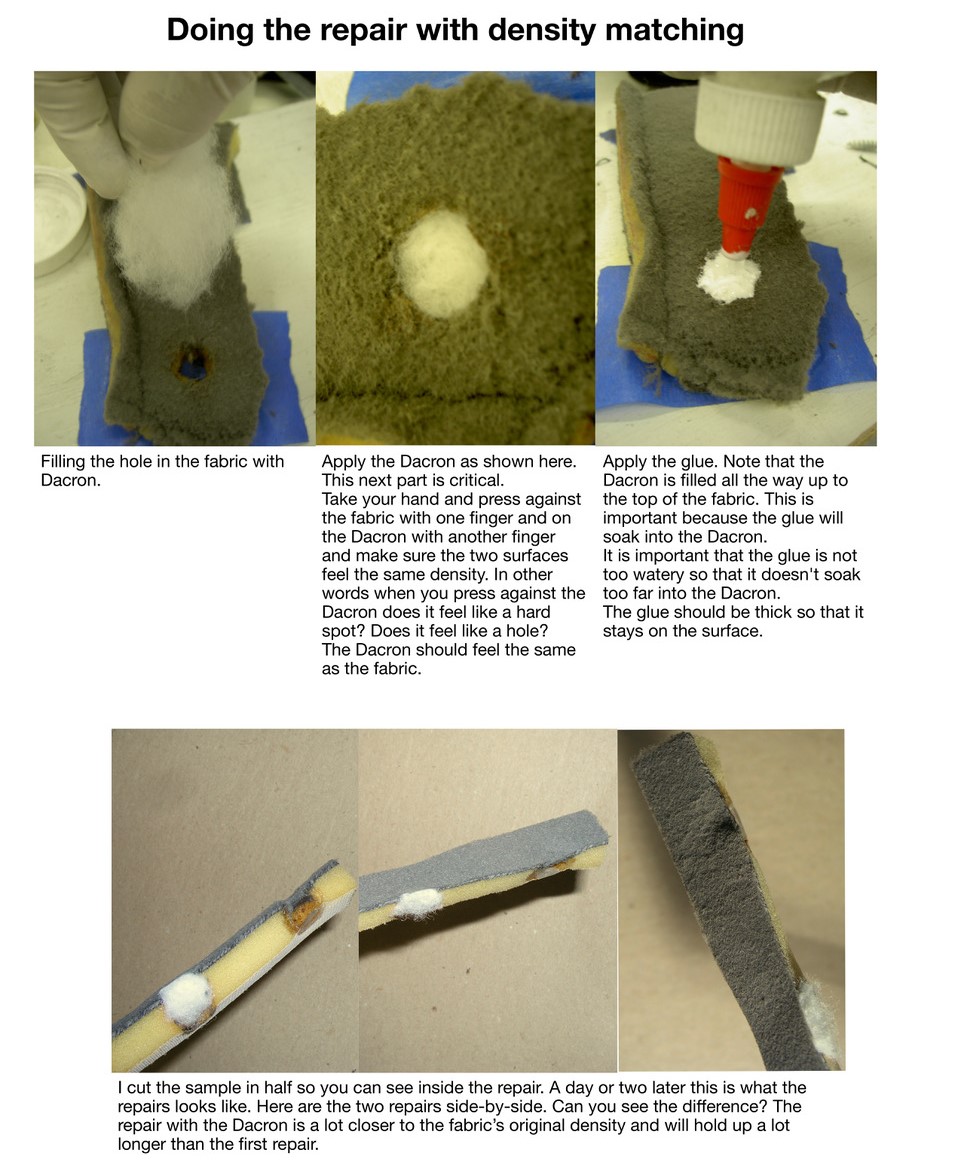
Below are pictures of an example applying this principle to a fabric repair. In the first group of pictures, the repair was done the wrong way. When I come across someone else’s repair that has failed, I end up tearing out the old repair and repairing the fabric with density matching, as shown in the second group of pictures.
 |
 |
Vinyl Repair
When doing vinyl repairs, you have more options. But there are so many different types of vinyl that density matching may take a little more experience. There are many different types of vinyl repair compounds. Some are more flexible than others. So how do you choose between all the different vinyl repair compounds?
I’ve asked other technicians, “How do you decide which vinyl repair compound to use on a particular vinyl?” Some would answer, “Well, I like this company’s compound better than this other company’s repair compound; it just seems to work better for me.” Another might say, “I use the leather repair compound on the leather and the vinyl repair compound on vinyl.” Hence, I would ask what they meant by that. The answer was something like, “You know, the thin, watery low- temperature vinyl repair compound, that’s the one I use on leather. And the regular vinyl repair compound is the one I use on vinyl.”
Another technician would chime in and say, “I sometimes use the super-strength vinyl repair compound in high-wear areas, because they say this compound is stronger.” None of these is the correct way to determine which vinyl repair compound to use.
In vinyl repair, I have found there are three most common vinyl repair compounds. The first type of compound, which I will call number 1, is the most flexible vinyl repair compound. This compound is mostly known as low-temperature vinyl repair compound or leather repair compound. The second type of compound, which I will call number 2 compound, is usually the middle-of-the-road, most common vinyl repair compound that most repairmen probably use. The third type of compound, which I will call number 3 compound, is known as super strength or Bulldog.
Now you ask yourself, “How would I figure out which type of compound to use?” The way I learned was by using all three types of compounds on many different types of vinyl. To help learn, I would cut pieces of vinyl from many different types of vinyl. Then I put three holes in each piece of vinyl on maybe 10 or 20 different samples as shown in the picture below.
I would label the holes for the each of the compounds, numbers 1, 2, and 3. Then I would use the three types of compounds on the different vinyl samples. I would cure the compound in each hole, so that each piece of vinyl had a sample of all three vinyl repair compounds. At that point, you can feel the difference between the compounds on the different vinyls. I would stretch and bend the vinyl to test it out. This helps, but, of course, this is something that you learn best with experience out in the field.

There is another piece of the puzzle, and that is the thickness of the vinyl and the type of “backing” used. As you can tell by the pictures above, vinyls have varying thicknesses and different types of backings. Some are thick, some are thin, some have mesh backing, some have foam, some have fabric, etc. The thickness and type of backing will affect the way the vinyl behaves, stretches and flexes, etc. Therefore, it is important to educate yourself on which compound will work the best.
Another common problem is when you have a piece of vinyl with foam glued on the back. How do you stop the compound from soaking into the foam? This sometimes can be a problem in itself. But I could go on and on, too much to address here.
Leather Repair
Leather repair is fairly simple, as long as you have a decent leather repair compound. I prefer an air-cured repair compound. Some people prefer a hot process. But if you apply too much heat to the leather, you can permanently damage it. So if you are using heat, you have to be very, very careful.
As far as density matching, you need a compound that simulates the characteristics of leather. It needs to stretch like leather and it has to be as strong. It is extremely important to keep the repair the same thickness as the leather. Be sure to use a sub-patch whenever possible to prevent the repair compound from getting into the foam. Though no pictures are available, the process is pretty straight forward.